Over the Christmas period, I've played a few gigs with my new amp and some issues have developed which I'm currently trying to fix. Once they're all sorted, I've got some new mods that I want to try out such as replacing the tone stack with something which will give a little more control.
The problems that I've noticed are as follows:
1. If someone plugs into the same socket/extension lead as me, I can "hear" them plugging in through my speaker (not really a huge problem since it only happens before and after a gig)
2. I was playing in gig that was run on generators and I found my amp was more noisy than usual. Also if my hands were close to my strings but not actually touching them I got a high pitched noise from my amp which went away if I actually touched the strings or moved my hands away (the proximity thing makes me think that it might be some weird capacitance thing...). This turned out to be so much of a problem that I couldn't use my amp for the gig and had to DI instead :(
3. A little more recently I've started to get some crackling sounds on low notes. I'm hoping that this turns out to be a dry solder joint, but I'm not hopeful because of the fact that the problem has developed over time and sounds like it's gradually getting worse...
Today's job is to poke around inside my amp checking for dry joints and then to check continuity and voltages at various points to see if I can track down any of the issues.
I'll update once I make any progress!
Saturday, 23 January 2010

Wednesday, 25 November 2009
Variable DI-Out
One feature which I really wanted to add to my amp to increase the versatility is a DI Output.
I was recently looking at the circuit diagram to a Mesa Boogie Studio .22 Caliber Plus, in order to replace the power supply capacitors for a friend and noticed that it had a really simple DI output with variable level. So using this as a basis, I came up modified my amp as follows:

I was recently looking at the circuit diagram to a Mesa Boogie Studio .22 Caliber Plus, in order to replace the power supply capacitors for a friend and noticed that it had a really simple DI output with variable level. So using this as a basis, I came up modified my amp as follows:

Changes highlighted in red.
I've seen some other mods out there to add DI outputs to similar amps that suggest taking the output from between the pre-amp stage and power amp stage, but the advantage of this mod is that since it's right at the end of the signal chain, it should sound exactly the same as the signal that reaches your cab... and I'm pleased to say that it works and sounds great :)
Tuesday, 24 November 2009
Speakon Speaker Connectors
The first mod which I wanted to carry out, is to add Speakon connectors for a better connection to my cab.
This is a very simple mod with the following circuit diagram:
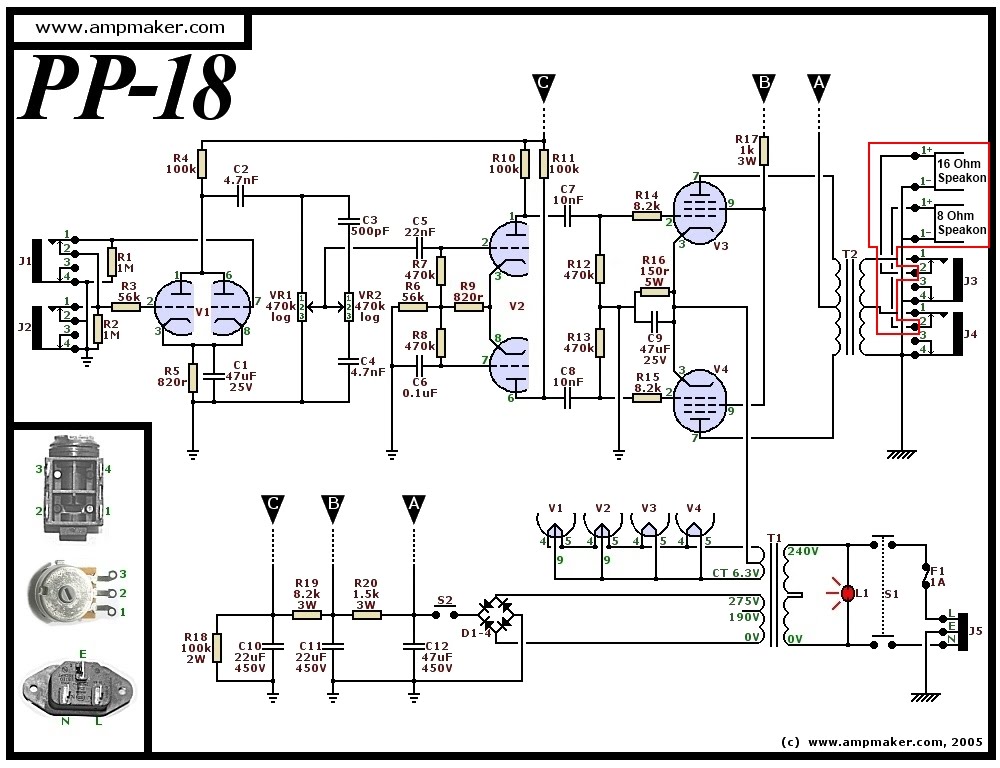
To see the differences between this circuit and the original, see the the original circuit diagram in this post: Vanilla
By connecting the positive inputs to the speakon sockets to pin 2 of the jack sockets, the speakon sockets will only be connected if a plug isn't inserted into the jack socket. This helps to prevent the eventuality of a speaker being plugged into both the jack and speakon socket being connected at the same time which could lead to an accidental impedance mismatch.
Update 25/11/2009:
Highlighted the changes in Red to make them more obvious.
Monday, 23 November 2009
Vanilla
2 weeks ago I received my order from Ampmaker - a PP-18 full valve, push-pull amplifier.
After 2 evenings work, it was finished and working nicely. Except that the tone stack wasn't ideal for bass guitar, which is what I will be using it for, so I started thinking about alternative tone stacks which I could use... and this led me to think of a number of modifications and customisations which I intend to carry out.
Over the coming weeks and months, I will post these modifications on here as I complete them and check that they work as expected. I'll also be posting photos of my amp in it's various stages of completion.
For now, here is the original circuit diagram and a link to Ampmaker should you want to purchase your own. I can highly recommend Ampmaker particularly since Barry, the owner of Ampmaker, has been incredibly helpful in discussing these ideas with me since my purchase.

After 2 evenings work, it was finished and working nicely. Except that the tone stack wasn't ideal for bass guitar, which is what I will be using it for, so I started thinking about alternative tone stacks which I could use... and this led me to think of a number of modifications and customisations which I intend to carry out.
Over the coming weeks and months, I will post these modifications on here as I complete them and check that they work as expected. I'll also be posting photos of my amp in it's various stages of completion.
For now, here is the original circuit diagram and a link to Ampmaker should you want to purchase your own. I can highly recommend Ampmaker particularly since Barry, the owner of Ampmaker, has been incredibly helpful in discussing these ideas with me since my purchase.
Subscribe to:
Posts (Atom)